IBM 6091 and 6091i 19 inch Monitor and Linux/X11
IBM 6091 and 6091i 19 inch Monitor and Linux/X11
The IBM 6091 and 6091i 19 inch monitor - now commonly available surplus -
makes a great display for a Linux box running XFree86. This is what you need:
- Your Linux box with XFree86 set up and old multisyncing monitor
- An SVGA card with programmable clockchip and a fair amount of memory -
there are a number of these out there, but I have personal experience
with cards with the following chipsets:
- S3 Trio64 with 2MB - limited bandwidth - I was able to get this working in 1024x768 on 6091
- S3 ViRGE with 4MB - limited to 80MHz bandwidth - max resolution 1024x1024 on 6091/6091i or 1152x890 on 6091
- S3 ViRGE/DX with 4MB - max resolution 1408x1200
- S3 ViRGE/GX with 4MB - max resolution 1408x1200
- A 15 pin d-shell to 5 BNC (RBG/HSync/VSync) VGA cable
- The 6091 or 6091i monitor
Keep in mind that I take no responsiblity for difficulties you may experience
in doing the following. While it's a fairly simple process if you have basic
Unix/Linux knowledge, I make no guarantees/warranties regarding this
document or any results (good or bad). However, keep in mind that I
have yet to hear of any failures using this or a similar process. Successes
are listed below (if you succeed and wouldn't mind being listed here, please
send me some email):
- Myself - Debian 1.3 on a 486/120 (granite) with S3 Trio64, ViRGE, and ViRGE/GX and 6091 and 6091i
(the various experimental configurations were research for this document)
- Marc Wissman - Red Hat (older version) and Win95 on a P5/100 with S3 ViRGE/DX and 6091
- Jay Zimmer - Red Hat 6.1 on a P5/90 with S3 Trio64 and 6091
Some of the sources used in getting this set up were:
- 6091/6091i specs:
- Setting up 6091/6091i monitors:
- For those interested in a possible Win95/98 solution, see this site.
Think you might need a newer video card or the BNC cable listed above? Search my sponsor for them!

This is how I recommend you do it (of course, I didn't do it this way - I do
everything the hard way) - everything here should be done as root:
- Make sure that you have a non-X11 console available to you (use ctrl-alt-F1
through ctrl-alt-F8, for instance [I recommend the ctrl because some window
managers suck up the alt, assuming you mean to do some window manager
operation]). Your X11 display should be available via ctrl-alt-F? if you wish
to return to it. If you don't seem to have any non-X11 consoles available,
edit your /etc/inittab:
- Note the number in the id:?:initdefault: line. This is the runlevel we
need to look for and add a getty for.
- Search for getty. You should see a section that looks something like this:
1:234:respawn:/sbin/getty 38400 tty1
2:23:respawn:/sbin/getty 38400 tty2
3:23:respawn:/sbin/getty 38400 tty3
4:23:respawn:/sbin/getty 38400 tty4
5:23:respawn:/sbin/getty 38400 tty5
6:23:respawn:/sbin/getty 38400 tty6
where the first column is the ID of the console and must match the tty
(at the end) - this is the same as the function key number, the
second column is the runlevels (found in the step above)
at which this program will be run. If, for instance, your
initdefault is 5, add 5 to one of the above's second columns. If you
want to be able to hit ctrl-alt-F1 and get a text console, you'd put
this 5 right after the 234 on the line:
1:234:respawn:/sbin/getty 38400 tty1
- Save and close /etc/inittab.
- Reboot your computer and ensure you now have a non-X11 text
console available.
- If you need to replace the video card, do the following:
- Install and point to the approprate X server for the new video card.
Unfortunately, how to go about doing this varies from Linux
distribution to Linux distribution. In Debian 1.3, edit
/etc/X11/Xserver so that the first line points to the X
server for your card, in the case of the S3 ViRGE or S3 ViRGE/GX,
XF86_S3V or
XF86_SVGA (if you really have something against accellerated servers),
commonly
installed in /usr/X11R6/bin. Note that it may be necessary to run
your package installer to install a server for your card or even
download the latest X server from
XFree.
My first line of my /etc/X11/Xserver file now is:
/usr/X11R6/bin/XF86_S3V
- Keep xdm from being run (if you don't do this and X11 doesn't happen
to startup exactly right [which it probably won't do after we swap out
your video card], Linux will continuously attempt to respawn an X11
login screen and you'll have quite some trouble doing any useful work
on one of those text consoles we made sure you had set up). Go to the
directory where the startup scripts for your initdefault (look in
/etc/inittab for this number) live. In Debian 1.3, this is /etc/rc?.d.
If the file with xdm in the filename is a symbolic link, simply remove
it. If not, move it to another directory for safekeeping. For
example, in
Debian 1.3 with an initdefault of 2, I would have done the following:
cd /etc/rc2.d
rm S99xdm
- Replace the video card:
- Shut down your computer, disconnect the monitor, and open the
case.
- Remove or disable (if video card is built into the motherboard -
this will likely take
looking at the manual for your computer to find out about a jumper
setting change, especially if you have an older 386 or 486 machine,
such as an old Dell or AST) the old video card.
- Install the new video card.
- Reconnect your old monitor. Close up the case. Start up
your computer.
- If all is well, you'll be able to login as root via one of the
consoles. If not, you may have to go back to your old video card
and back out/double-check your changes from above.
- Now it's time to hack the XF86Config (commonly located in /etc/X11). It
might be a good idea to make a backup copy of it first just in case things
don't work out right. (cp XF86Config XF86Config.old) Keep in mind
that the XFree86 information below,
even though it was only tested on S3 ViRGE cards, will likely work on your
card if it has a programmable clockchip.
- Add the S3 ViRGE or
S3 ViRGE/GX monitor section
to your XF86Config. A good place to put it would be near
your old monitor section. Be sure not to accidentally insert it in
the middle of an old monitor section.
Note that commented modelines
(lines that start with the # symbol) were the originals from one of
the documents referenced above. The uncommented ones were created by
myself using xvidtune to better fit the image to my display.
- Add the S3 ViRGE or
S3 ViRGE/GX device section
to your XF86Config. A good place to put it would be near your old
device section. Be sure not to accidentally insert it in the middle
of your old device section.
Note that this is basically a dummy
placeholder - the SVGA X server (at least version 3.3) autodetected
everything about the S3 ViRGE card, and the S3ViRGE X server autodetected
everything about the S3 ViRGE/GX. You may have to add extra info
to this section depending on which card you use.
- Add the S3 ViRGE or
S3 ViRGE/GX screen section
to your XF86Config to tie everything together and remove the old one.
A good place to put it
would be in place of your old screen section.
Once we finish getting everything hooked up, you
should be able to cycle through these modes using ctrl-alt-+ and
ctrl-alt-- (+ and - on the keypad). Keep in mind that you may have
to switch refresh rates on the monitor using the 1-2-3 switch on the
front panel of the 6091 or the 1-2 switch on the front panel of the
6091i in order for the image to sync or appear properly.
- If you would like, try out the new card and config file on your old
multisyncing
monitor by typing startx. NOTE: Before you try this, be prepared
to either switch off
your monitor or exit X11 using ctrl-alt-backspace if your monitor
doesn't sync up almost immediately. If your old monitor's refresh
rates don't include these fixed frequencies we've set in your
XF86Config, it might (albeit unlikely) damage your old monitor!
If your old monitor works, great! If it doesn't:
- Did you have to use ctrl-alt-backspace to get back to your text
console? If you did, then most likely things will work on
your 6091/6091i.
- Did startx fail with an error message? You may need to produce
a log file to read so that you can resolve the problem. If you're
using tcsh or csh, use startx >& startx.log to produce a startx.log
file.
- Now it's time to hook up the 6091 or 6091i to your video card.
- Disconnect your old monitor from the computer.
- Connect the D-shell side of your new monitor cable to the computer.
- Connect the other end of the cable (the 5 BNCs as follows):
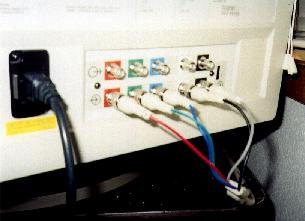
- Connect the red
-wire BNC to the lower red connector on the 6091/6091i.
- Connect the green
-wire BNC to the lower green connector on the 6091/6091i.
- Connect the blue
-wire BNC to the lower blue connector on the 6091/6091i.
- Connect the black
-wire BNC to the lower white connector on the 6091/6091i.
- Connect the gray
-wire BNC to the lower black connector on the 6091/6091i.
Note that the black/white and black/gray are swapped on my cable.
Your cable may actually have these horizontal and vertical sync
signals correct, and therefore may require swapping if your monitor
doesn't sync up.
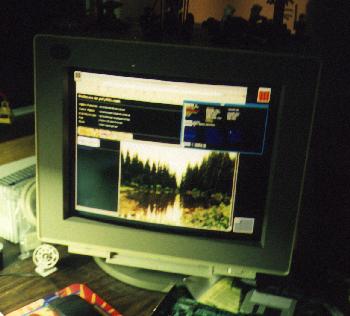
- Plug in power to the 6091/6091i and turn it on. If it works,
congratulations! You now have a 19" high resolution display! Note that I still have yet to
have text modes working on my 6091 (so don't forget to run startx). Therefore, in order to use
this monitor, I am forced to
use X11 (which was the whole point of this exercise, right?). If anyone has hints on getting
the SVGA text mode correctly set up, please
email me.
- Once we have the new monitor working, set up your computer to fire up xdm
again. Go back to the directory where the startup scripts for your
initdefault (again, look in /etc/inittab for this number) are. In Debian
1.3, this is /etc/rc?.d. Either re-make the symbolic link or move the
file back from the other directory you saved it in. For example, in
Debian 1.3 with an initdefault of 2, I would have done the following:
cd /etc/rc2.d
ln -s ../init.d/xdm S99xdm
If you'd like to let me know how your mileage varied with this
procedure, please do. Who knows, you may have some thoughts on the subject that were never considered!
-Brendan